Oil Pan
Oil Pan
If large quantities of metal particles or abraded material are detected during engine repairs, it may mean the crankshaft or rod bearings are damaged. To prevent further damage, the following steps must be carried out after the repair:
Carefully clean the oil passages
Replace the oil cooler
Replace the oil filter element
Special tools, testers and auxiliary items required
• T Bar and Socket 10 mm (3185)
• Hex Ball Socket (T10058)
• Torque Wrench (5-50 Nm) (V.A.G 1331)
• Used Oil Collecting and Extracting Device (V.A.G 1782)
• Silicone Sealant (D 176 404 A2)
• Hand Drill with Plastic Brush Attachment
• Protective Eyewear
• Flat Scraper
Removing
- Remove the noise insulation.
- Place the used oil collecting and extracting device (V.A.G 1782) under the engine and drain the engine oil.
• Observe disposal regulations!
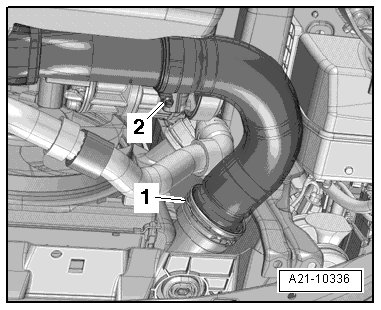
- Loosen the clamp - 2 -, lift the circlip - 1 - and remove the cold side connecting hose, see - item 4 - in the => [ Charge Air System Components Overview ] Service and Repair.
- Remove the bolts - arrows - for the charge air pipe and move it to the side.
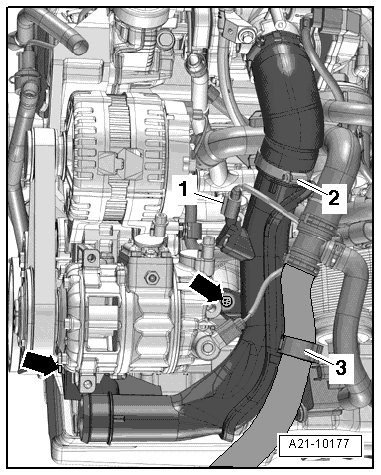
- Remove the bolt - arrow - and move the engine coolant circulation pump 2 to the side.
- Remove the bolt - arrow - for the hot side charge air pipe.
- Disconnect the connector from the oil level thermal sensor.
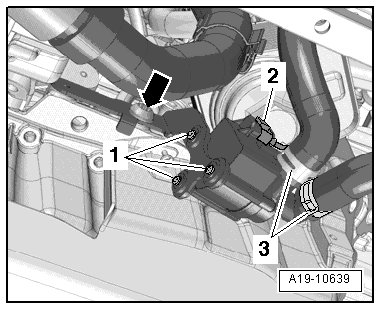
- Remove the bolts securing the oil pan to transmission.
- Remove the oil pan bolts in a diagonal sequence.
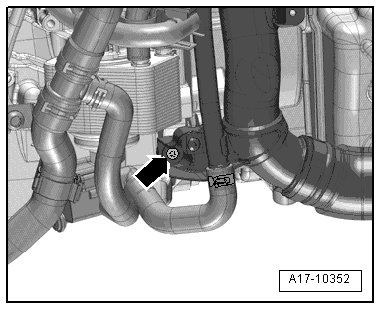
- Loosen the oil pan with light blows of a rubber mallet, if necessary.
- Remove any sealant residue from the crankshaft housing with a flat blade scraper.
Wear protective eyewear.
- Remove any sealant residue from the oil pan using a rotating brush, for example, using a hand drill with a plastic brush attachment (wear eye protection).

- Clean the sealing surfaces. They must be free of oil and grease.
Installing
• Note the expiration date of the sealant.
• The oil pan must be installed within 5 minutes after application of the silicone sealant.
- Cut the sealant tube nozzle at the front mark (nozzle diameter: approximately 3 mm).
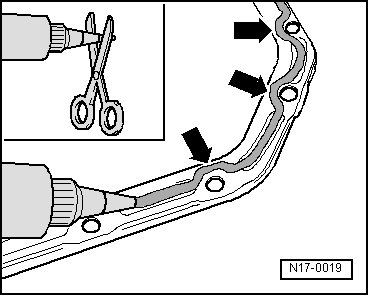
- Apply the silicone sealant as illustrated. The sealant bead must be:
• 2 to 3 mm thick
• and run on the inside of the bolt holes - arrows -
The lubrication system could be plugged with excess sealant.
• Do not apply the sealant bead thicker than indicated.
- Apply the bead of sealant as illustrated to the clean sealing surface on the oil pan.
• Thickness of sealant bead: 2 to 3 mm.
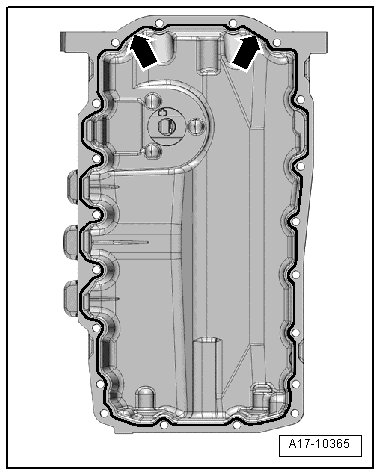
• Being especially careful, apply a bead of sealant around the sealing flange - arrows -.
• The oil pan must be installed within 5 minutes after applying the sealant.
- Position the oil pan and tighten the bolts securing the oil pan to the transmission and all of the oil pan bolts. Make sure the oil pan lies flush on the intermediate plate/transmission flange.
• When installing the oil pan to a removed engine, make sure that the oil pan is positioned flush with the crankshaft housing on the flywheel side.
- Tighten the oil pan bolts in a diagonal sequence to 15 Nm.
- Tighten the oil pan to transmission bolts to 40 Nm.
• After installing the oil pan, allow the sealant to dry for approximately 30 minutes. Only after then may the engine oil be added.
Further installation is in the reverse order of removal.