Voltage Supply, Checking
Voltage Supply, Checking
Special tools, testers and auxiliary items required
• Multi-meter, for example, Multi-Meter (V.A.G 1526 D)
• Current Clamp (V.A.G 1526B/2) , or equivalent
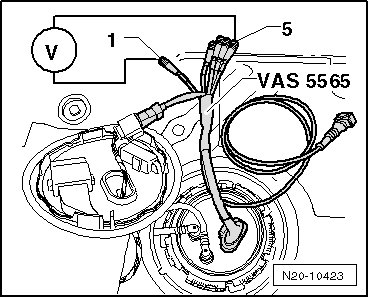
• Test Instrument Adapter/DSO (5-pin) (VAS 5565)
Test Conditions:
• The fuses must be OK.
• Battery voltage must be a minimum of 12 volts. Connect a battery charger if necessary.
• All electrical consumers such as, for example, lights and rear window defogger, must be turned off.
- Disconnect the connector from the auxiliary fuel pump/fuel pump 2 (in-line electric fuel pump) inside the engine compartment.
- Remove the rear seat bench.
- Fold the carpet to the side or towards the front.
- Remove the cover from the fuel delivery unit.
- Turn the ignition on. The fuel pump must run audibly for approximately 2 seconds.
- Turn the ignition off.
If the fuel pump does not activate:
- Disconnect the connector from the fuel delivery unit flange.
- Connect the rest instrument adapter/DSO (5-pin) (VAS 5565) between the connectors on the cover and the flange.
- Connect the multi-meter to the test contacts - 1 and 5 - on the rest instrument adapter/DSO (5-pin) (VAS 5565).
- Connect the vehicle diagnostic tester and perform the guided function "Check Electric Fuel Pumps".
• The fuel pump now runs for 30 seconds.
- Read the voltage value on the multi-meter:
Target value = approximately the battery voltage.
If there is no voltage:
- Check activation of fuel pump relay and check the wires for an open circuit and a short circuit.
If the voltage supply is OK:
- Remove the fuel delivery unit. Refer to => [ Fuel Delivery Unit ] Fuel Delivery Unit.
- Check if the electrical wiring between the flange and fuel pump is connected and has continuity.
If no open circuits are found:
- Replace the fuel delivery unit.